fwup for A/B image upgrades on QEMU machines with NervesCloud, part III
This blog post shows how to use NervesCloud in order to upgrade and manage linux images based on Yocto Project.
We will run this demonstration with QEMU ARM based machine prepared as a result of previous blog post called fwup for A/B image upgrades on QEMU machines with fwup, part II.
What is NervesCloud
NervesCloud is an instance of NervesHub based on cloud. It could be considered NervesCloud as a SaaS for NervesHub. In that way, instead you having to install and manage your own instance of NervesHub for Nerves devices management, NervesCloud takes care of all the infrastructure and provides to you the benefits without worry with details.
In this demonstration, we will use NervesCloud with a development account called Experiments. As NervesCloud is a multi-tenant system, anyone can have an account for real or development purposes.
It's not part of this demonstration how to setup a NervesCloud account. However, I would like to say thank you to NervesCloud team to take care of these details.
Preparing a key pair for firmware signing
NervesCloud works with signed firmware images files. It's mandatory to signed these images before uploading into NervesCloud.
I expected that you have a working Elixir environment for the following steps.
Clone nerves_hub_cli project:
git clone https://github.com/nerves-hub/nerves_hub_cli
cd nerves_hub_cli
Let's start configuring two environment variable that nerver_hub_cli tool will use:
export NERVES_HUB_ORG=Experiments
export NERVES_HUB_URI=https://devices.nervescloud.com
Next, we need to create a key pair for signed fw files later. For that, we use
the subcommand nerves_hub.key create:
mix  nerves_hub.key create QemuMachines1
NervesHub server: devices.nervescloud.com:443
NervesHub organization: Experiments
Creating a firmware signing key pair named 'QemuMachines1'.

The private key is stored locally and must be protected by a password.
If you are sharing the firmware signing private key with others,
please choose an appropriate password.

Signing key password for 'QemuMachines1':

Firmware public key written to '/home/joaohf/.nerves-hub/keys/Experiments/QemuMachines1.pub'.
Password-protected firmware private key written to '/home/joaohf/.nerves-hub/keys/Experiments/QemuMachines1.priv'.

Registering the firmware signing public key 'QemuMachines1' with NervesHub.

22:35:09.524 [info] POST https://devices.nervescloud.com/api/orgs/Experiments/keys -> 201 (578.459 ms)

22:35:09.528 [debug]
>>> REQUEST >>>
(no query)
Authorization: token nhu_xyz

%{name: "QemuMachines1", key: "xyz"}

<<< RESPONSE <<<
date: Sun, 09 Feb 2025 22:35:08 GMT
content-length: 86
vary: accept-encoding
content-type: application/json; charset=utf-8
cache-control: max-age=0, private, must-revalidate
strict-transport-security: max-age=31536000
x-request-id: GCKrFDWwXjoGnjQAHQLx
server: Fly/1ab217aa (2025-02-07)
via: 1.1 fly.io
fly-request-id: 01JKPDMBHQP83WW1971PCXC0FZ-gig

%{"data" => %{"key" => "xyz", "name" => "QemuMachines1"}}

Success. Key information:
  name:       QemuMachines1
  public key: xyz
The main outcome here is that the command nerves_hub.key create has created a
valide key pair called QemuMachines1. We also need to export this key pair to
something that Yocto can read later. For that, we use the command
nerves_hub.key export:
mix nerves_hub.key export QemuMachines1
NervesHub server: devices.nervescloud.com:443
NervesHub organization: Experiments
Local signing key password for 'QemuMachines1':
Fwup keys exported to: /home/joaohf/.nerves-hub/nerves_hub-fwup-keys-Experiments-QemuMachines1.tar.gz
That is great, the key pair QemuMachines1 is ready. We just need one small step in order to extract two files from the tar.gz file:
mkdir /tmp/exported_keys
tar zxf ~/.nerves-hub/nerves_hub-fwup-keys-Experiments-QemuMachines1.tar.gz -C /tmp/exported_keys
And finally, we have the keys as expected:
ls -l /tmp/exported_keys
total 8
-rw-r--r-- 1 joaohf joaohf 88 fev  9 19:36 QemuMachines1.priv
-rw-r--r-- 1 joaohf joaohf 44 fev  9 19:36 QemuMachines1.pub
Keep QemuMachines1.priv and QemuMachines1.pub files around. We will need to configure Yocto in order to make fwup signed firmwares automatically.
Upgrade/Downgrade demonstration
As always, I like to describe all steps. In case someone wants to try it. My target here is to play with NervesCloud for upgrade -> downgrade -> upgrade cycle.
YP/OE Setup
I'll try to simplify the YP/OE setup to just tree small steps:
This is the same steps taken for the previous blog post called fwup for A/B image upgrades on QEMU machines with fwup, part II. But now, with one additional layer called meta-nerves_hub.
-
Cloning all repositories for master release:
git clone --branch master git://git.yoctoproject.org/poky
git clone --branch master https://github.com/openembedded/meta-openembedded.git
git clone --branch master https://github.com/fwup-home/meta-fwup
git clone --branch master https://github.com/joaohf/meta-fwup-examples
git clone --branch master https://github.com/meta-erlang/meta-qemu-bsp
git clone --branch master https://github.com/meta-erlang/meta-erlang
git clone --branch master https://github.com/meta-erlang/meta-axon
git clone --branch master https://github.com/joaohf/meta-nerves-hub -
Source the init build environment script:
cd poky
source oe-init-build-env ../build -
Add the needed layers:
bitbake-layers add-layer ../meta-openembedded/meta-oe
bitbake-layers add-layer ../meta-fwup
bitbake-layers add-layer ../meta-qemu-bsp
bitbake-layers add-layer ../meta-fwup-examples
bitbake-layers add-layer ../meta-nerves-hub
bitbake-layers add-layer ../meta-axon
bitbake-layers add-layer ../meta-erlang
Configuring the build environment
For this use case, the quickest way is edit and add the conf/local.conf configuration file.
We start defining the MACHINE and DISTRO:
MACHINE = "qemuarm64-uboot"
DISTRO = "poky"
The machine qemuarm64-uboot is provided by meta-qemu-bsp layer. That machine uses u-boot as bootloader.
As YP/OE supports many types of image outputs, we want to be specific here and pick only the fwup type.
tee -a <<EOF conf/local.conf
# enable support for making fwup images
IMAGE_CLASSES += "image_types_fwup"
IMAGE_FSTYPES = "fwup fwup.qcow2"
EOF
Configure NervesCloud product name
Edit the file conf/local.conf and overwrite the variable FWUP_META_PRODUCT
with the contents of NervesHub Cloud product. In my case the product name is
YoctoFwup:
tee -a <<EOF conf/local.conf
# NervesHub product name
FWUP_META_PRODUCT = "YoctoFwup"
EOF
Configure private and public keys for fwup tool
The bbclass imagetypes_fwup.bbclass takes care of signing fwup images when the
variables FWUP_PRIVATE_KEY_FILE and FWUP_PUBLIC_KEY_FILE are available. For
this demonstration, we need to make signed .fw (firmware update files) images.
Let's add these two variables to _conf/local.conf too:
tee -a <<EOF conf/local.conf
FWUP_PRIVATE_KEY_FILE = "/tmp/exported_keys/QemuMachines1.priv"
FWUP_PUBLIC_KEY_FILE = "/tmp/exported_keys/QemuMachines1.pub"
EOF
That is all for this step.
Build fwup firmware
In this experiment we will build two images. And, for each build, the variable
FWUP_META_VERSION will be changed.
Let's start creating an image that represents the version 1.0.1. Edit the file conf/local.conf and add the following:
# 1st build
FWUP_META_VERSION = "1.0.1"
Next, we need to build a new image:
bitbake multiconfig:qemuarm64-uboot-nerves-hub-link:core-image-full-cmdline
After this build, let's copy the signed fwup firmware image (*signed.fw) to a temporary folder. For better organization, rename it adding the version "1.0.1":
cp tmp-qemuarm64-uboot-glibc-nerves-hub-link/deploy/images/qemuarm64-uboot/core-image-full-cmdline-qemuarm64-uboot.rootfs-20250126203524.fw \
  /tmp/core-image-full-cmdline-qemuarm64-uboot.rootfs-20250126203524-1.0.1.signed.fw
Ok. We got the version 1.0.1. Now, let's prepare the version 1.2.0.
Still in build folder, edit the file conf/local.conf and change the variable
FWUP_META_VERSION:
# 2nd build
FWUP_META_VERSION = "1.2.0"
Build the new image:
bitbake multiconfig:qemuarm64-uboot-nerves-hub-link:core-image-full-cmdline
And when finished, copy the fwup firmware (*signed.fw) to a temporary folder. Add to the filename the version "1.2.0":
cp tmp-qemuarm64-uboot-glibc-nerves-hub-link/deploy/images/qemuarm64-uboot/core-image-full-cmdline-qemuarm64-uboot.rootfs-20250126211722.fw \
  /tmp/core-image-full-cmdline-qemuarm64-uboot.rootfs-20250126211722.1.2.0.signed.fw
The final result is like that:
ls -l /tmp
-rw-rw-r-- 1 229596347 jan 26 18:02 core-image-full-cmdline-qemuarm64-uboot.rootfs-20250126203524-1.0.1.signed.fw
-rw-rw-r-- 1 229596346 jan 26 18:23 core-image-full-cmdline-qemuarm64-uboot.rootfs-20250126211722.1.2.0.signed.fw
There are two signed fwup firmware images ready to be uploaded into Nerves Cloud.
fwup firmware upload
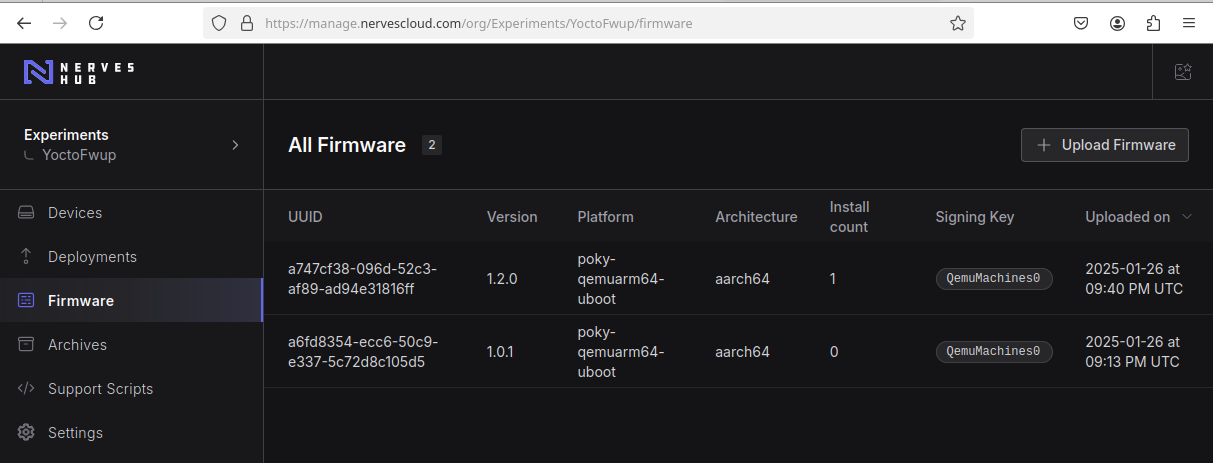
The procedures to upload the fwup image is very simple. Inside the NervesCloud web interface, go to 'Firmware' menu and use the button 'Upload Firmware' to start uploading a new firmware file.
We'll need to upload both images (1.0.1 and 1.2.0) for the next exercises. The final Firmware list pages should be something like that:
Playing with upgrades
Now, it's time to observe and play with some upgrades and downgrades.
First, let's start runqemu with our last image build:
runqemu  nographic serialstdio slirp \
multiconfig:qemuarm64-uboot-nerves-hub-link:core-image-full-cmdline \
wic.qcow2 qemuparams="-m 1024"
In my case, the parameter -m 1024 was necessary because my development images
were a bit oversized.
Inside QEMU instance, start nerves_cloud_link application:
/usr/lib/nerves-hub-link/bin/nerves_hub_link start_iex
In NervesCloud web interface, check with the device has listed there:
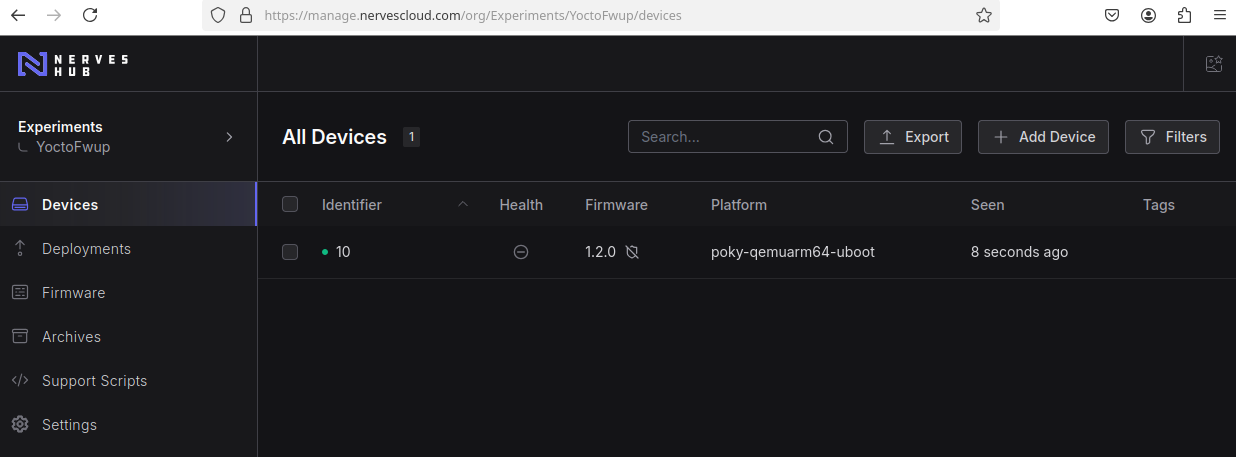
The 'Firmware' column should be pointing to '1.2.0' version (because this version was the latest build).
For upgrade and downgrade using NervesCloud, there are some options like creating a Deployment or send an update command to a specific device. In this experiment, let's send update command.
We want to test the following scenarios:
-
downgrade 1.2.0 -> 1.0.1
Select the device that we want to work, in my case the device is '10'. And on device administration page, select the firmware version that we want to send. In this case it will be the version 1.0.1. And click on "Send update" button.
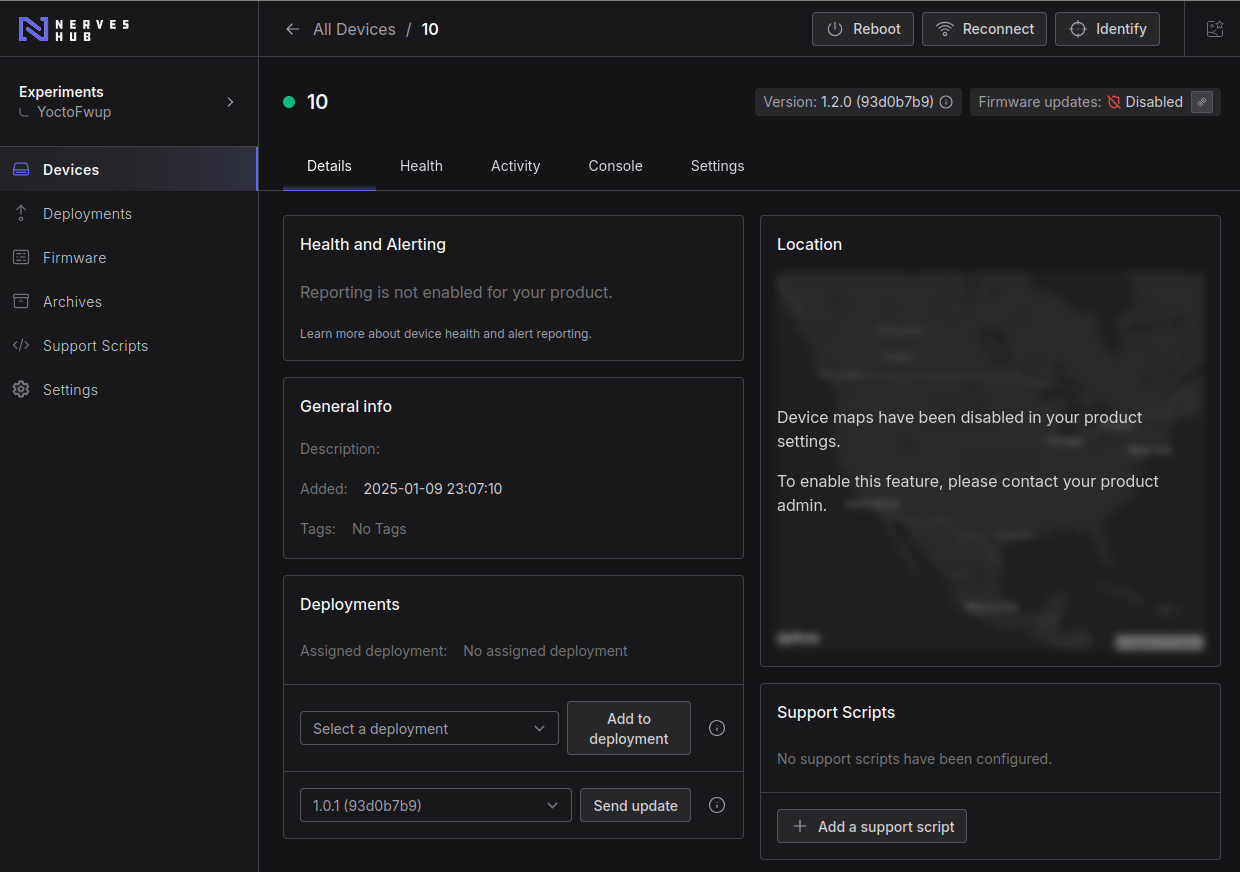
While NervesCloud is sending the new firmware to device, on QEMU console we can check that nerves_hub_link is working as expected:
22:01:38.452 [info] [NervesHubLink] Resuming download attempt number 0 https://files.nervescloud.com/firmware/38/a6fd8354-ecc6-50c9-e337-5c72d8c105d5.fw?X-Amz-Algorithm=AWS4-HMAC-SHA256
22:01:38.469 [info] [NervesHubLink] Downloading firmware: https://files.nervescloud.com/firmware/38/a6fd8354-ecc6-50c9-e337-5c72d8c105d5.fw?X-Amz-Algorithm=AWS4-HMAC-SHA256
22:01:38.472 [notice]     :alarm_handler: {:set, {NervesHubLink.UpdateInProgress, []}}
22:01:38.482 [debug] [NervesHubLink] FWUP PROG: 0%
22:01:39.627 [warning] [NervesHubLink] FWUP WARN: Upgrading partition B
22:01:40.114 [debug] [NervesHubLink] FWUP PROG: 1%
22:01:40.551 [debug] [NervesHubLink] FWUP PROG: 2%
22:01:40.552 [debug] [NervesHubLink] FWUP PROG: 3%
....
....
....
22:02:09.478 [debug] [NervesHubLink] FWUP PROG: 100%
22:02:09.481 [info] [NervesHubLink] FWUP SUCCESS: 0
22:02:09.482 [info] [NervesHubLink] FWUP Finished
22:02:09.483 [notice]     :alarm_handler: {:clear, NervesHubLink.UpdateInProgress}
22:02:09.484 [info] Elixir.Nerves.Runtime.Power : device told to reboot
22:02:09.488 [error] Heart: Erlang heart isn't running. Check vm.args.
22:02:09.731 [warning] [NervesTime] Stopping RTC NervesTime.FileTime: :shutdown
The device will update and reboot. When QEMU instance is back, start nerves_hub_link again and check the expected version in NervesCloud web interface:
noteThe manual start is OK for this experiment. Just execute nerves_hub_link again on QEMU console:
/usr/lib/nerves-hub-link/bin/nerves_hub_link start_iex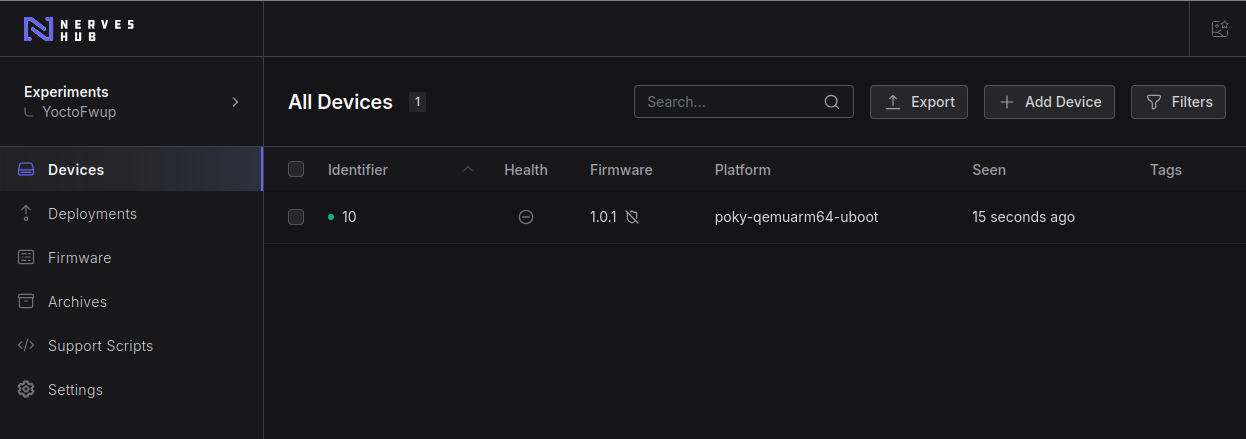
Very good, the downgrade has been completed.
-
upgrade 1.0.1 -> 1.2.0
Now, it's time to perform an upgrade from 1.0.1 to 1.2.0 version. Following the same steps above, but selecting the version 1.2.0 this time, the device will be updated to 1.2.0 version:
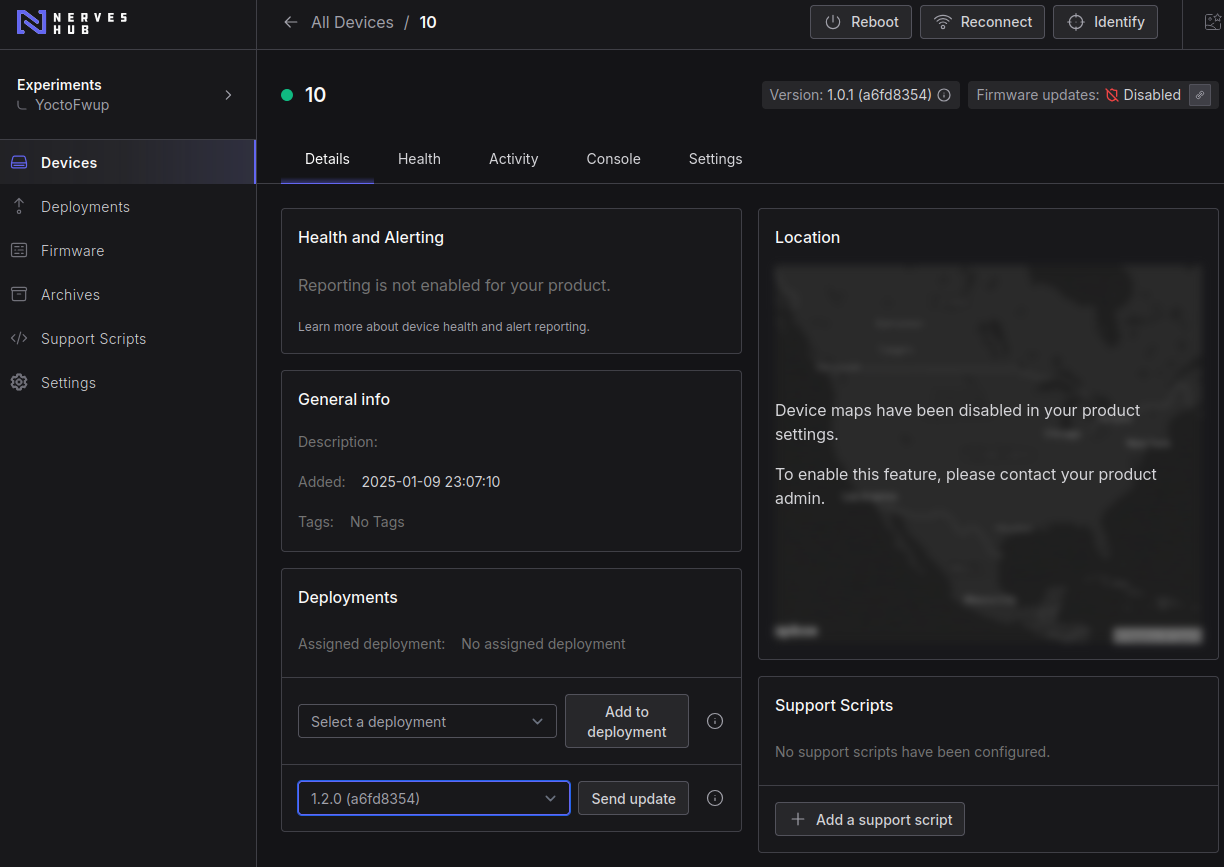
When QEMU is back, we can check which version NervesCloud will show:

We can play with this dancing many times. Proving that upgrade/downgrade works as expected.
Some low level details: introducing meta-nerves-hub
meta-nerves-hub
meta-nerves-hub layer is a new layer introduced to keep common application and configurations for NervesHub and Nerves Project working with Yocto Project. The purpose is to bring essential and base components for anyone that wants to use YP/Openembedded in your products.
meta-nerves-hub has a recipe called nerves-hub-link_2.5.2.bb which builds nerves-hub-link application. I had to apply two patches for nerves-hub-link source code in order to make it work well when building inside Yocto environment:
-
The first one is 0001-Use-MIX_TARGET_INCLUDE_ERTS-for-include-ERTS-release.patch
-
And the second one was about using KVBackend from UbootEnv instead memory: 0001-Use-UbootEnv-as-kv_backend.patch
extending nerves-hub-link recipe
The nerves-hub-link recipe is not intend for use as standalone. It's purpose is for development and demonstration. When running nerves-hub-link it's necessary to configure it with the correct shared secret credentials.
To get quick results, I've extended nerves-hub-link from meta-axon layer with the correct shared secret credentials used by my development instance on NervesCloud.
For a real use of nerves-hub-link, the correct way would be creating a new Elixir application that has nerves-hub-link as dependency and make all the configuration needed.
The NervesCloud team are working on a pre-build agent model, which will simplify setup and configuration.
Conclusions
I am having so much fun playing with fwup and NervesCloud that I will keep improving this environment. Just to recap the adventures so far:
It is all about enabling features and managing what is feasible or not. Of course, implementing the missing parts. When building products with Yocto Project, it is a bit like playing a open-world video game. You have to have a target in mind.
My plan is to continue adding more fwup configurations into meta-fwup-examples layer in order to support more BSP layers and well know boards like raspberrypi. Also, trying to use some other processor architectures like: riscv, ppc, mips all running on QEMU and Yocto Project. I will stay in this loop until get something stable.
